Building my Jota

Hi Todd, radial master cylinder?s are really nice to use as all the forces are directly on the back of the piston. Even better if you have an adjustable ratio one . Fitted one to my aprilia factory and was quite a different feel to the single ratio one fitted as standard. Was either a very progressive feel or full on power. Made me aware of just how good modern brakes are when I heard the front chirping😳 ,wasn?t intended but was impressive 😀👍
Tom
 
ozijotati said:
Hi Todd, radial master cylinder?s are really nice to use as all the forces are directly on the back of the piston. Even better if you have an adjustable ratio one . Fitted one to my aprilia factory and was quite a different feel to the single ratio one fitted as standard. Was either a very progressive feel or full on power. Made me aware of just how good modern brakes are when I heard the front chirping😳 ,wasn?t intended but was impressive 😀👍
Tom


thanks mate
 
chrisk said:
Photos make the printed bits red, are they staying red? Great red result though Todd.

Hi Mate, cheers

the red is just my model bits... the real bulkhead will be laser cut carbon, and the old battery tray floor will be black painted ASA , if i dont end up bolting anything too it. If i need to bolt something to it, that will be carbon as well.

Im happy with using carbon, but on a bike like this, which is still kinda classic, I dont want clear coated carbon weave every where
 
Right... I have been slammed at work the last week or two so not much has been done, my rego day is well and truely shot, even though Red met my deadline others haven't , so thanks anyway Red.
I have my blasting cabinet at Miguels, so I whipped over there on Sunday arvo and blasted my rear sets, they came out insanely good. Back at the bat cave I am well into my wiring, I made my little rubber wedge funnel design longer , and that has worked out really well for the clip on wiring. You can see how nice they came out, Its slow painful work for me as Im not experienced at wiring... but its coming along
 

Attachments

  • IMG_6324.jpeg
    IMG_6324.jpeg
    110.9 KB · Views: 73
  • IMG_6339.jpeg
    IMG_6339.jpeg
    73.6 KB · Views: 85
  • IMG_6341.jpeg
    IMG_6341.jpeg
    201.9 KB · Views: 86
  • IMG_6369.jpeg
    IMG_6369.jpeg
    255.7 KB · Views: 76
  • IMG_6371.jpeg
    IMG_6371.jpeg
    49.2 KB · Views: 69
I have been busy doing the printing of the prototype electrical bulk head cover as well, and also I have worked out how the seat unit will be held down at the front. the first shot is the 3d design, second shot is the prototype print and in place on the bike, the 3 grooves are to carry on running the battery cables down to the bulkhead. This material I printed with is a thermo plastic urethane, so its like a hard rubber with some shock absorption in it, the seat unit fastens onto this under the seat cushion, then I will design/draw print the bottom half which has frame cut outs on each side, to bolt into the top piece keeping everything clamped on to the frame... hope that makes sense , if not now it will make sense when I show the finished prototype. In the last photo, I cut some foam to represent the depth of the electrics , and then drew up a cover that will go over the top of this to keep everything hidden, safe and dry. I only print things on weekends and at nights if the printer is idle, but lately its been running 60 hours non stop with a 29 hour print and a 31 hour print, so I cant get finish that work just yet, and that helps, because sometimes taking a break of doing bike prints lets me see things that I didnt see previously which means designs change, and i dont waste material or hours or effort printing something that would quickly become obsolete. I plan on getting the rear sets on this weekend and draw up the ignition box holder that will bolt onto the back of the electrical bulkhead with the same fasteners as the regulator... thats the plan anyway.. lest see if that works. House of D'art ( thanks again Bevellman for the contact) have made the chain guard which is on its way... fast turn around, great price, and easy to deal with... what more can you ask for
 

Attachments

  • IMG_0281.PNG
    IMG_0281.PNG
    104.9 KB · Views: 61
  • IMG_6295.jpeg
    IMG_6295.jpeg
    100.9 KB · Views: 61
  • IMG_6296.jpeg
    IMG_6296.jpeg
    116.4 KB · Views: 70
  • IMG_6256.jpeg
    IMG_6256.jpeg
    169.4 KB · Views: 72
  • IMG_0283.PNG
    IMG_0283.PNG
    105 KB · Views: 79
Hi Todd, radial master cylinder?s are really nice to use as all the forces are directly on the back of the piston. Even better if you have an adjustable ratio one . Fitted one to my aprilia factory and was quite a different feel to the single ratio one fitted as standard. Was either a very progressive feel or full on power. Made me aware of just how good modern brakes are when I heard the front chirping😳 ,wasn?t intended but was impressive 😀👍
Tom
Cheers mate, I have arriving Radial Clutch and Brake master cylinders on this coming Wednesday. I did look at the Hel ones, but no one could give me any comments on them, so I went the more travelled road and went with Brembo. Carpimoto have a good deal going on them, with about 30% discount on each one. The PS ones that I have now, can move onto the 1200.
 
Hi Rob

she’s out in the breeze. AMD on the front side of the bulkhead. Anything that doesn’t need to be hidden, water proofed or cooked by air gets hidden on the other side. This red bulkhead will later be in carbon painted satin black. It’s just my template, kind of like the old bread board electronic kits kids had when they were young .... if anyone remembers those ... I’m younger than most so the ones from Dick Smith ( aussies and kiwis will know this brand) came on particle board! The guys that built the reg said it’s fine on its side and could be hidden away as well but this gives me some extra space by it being out here. This one is custom made for lithium batteries , which sounds posh but in all reality it’s only 20 euros more than an off the shelf item , and I know it’s not a Knock off or a fake as it was made for me. So it was worth to pay the extra 20.

848D9725-4D11-40CF-9ED2-A27E739A6007.jpeg
 
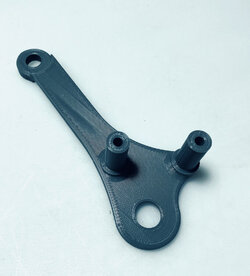
This weekend aside from getting my Duke back on the road , I got the rear sets on, and finalised my rear brake master cylinder bracket. I binned the old idea and went with the one below. I’ve just mailed the step file to my machinist mate in Milan who will cnc it with the front brake caliper adaptors. I’m back into the electrics mounting everything on the bulkhead for the final dry fit before I cut the carbon one. Busy days in my shed. Kat has been sending food , tea and coffee and CB popping out to see progress. Managed amongst house chores to get out for a ride on the Duke with Kat on the back , in 16 degree blue skies and sunshine. It’s been a brilliant weekend.

AFE08F41-9163-4DCB-B030-B5ABD0B33DEA.jpeg
 

Attachments

  • 1112243C-CED7-4126-8F51-53AB8B066044.jpeg
    1112243C-CED7-4126-8F51-53AB8B066044.jpeg
    71.2 KB · Views: 60
  • 2B1D8283-AF36-456C-B1FF-1D44A2ADD35C.jpeg
    2B1D8283-AF36-456C-B1FF-1D44A2ADD35C.jpeg
    196.3 KB · Views: 69
  • 31C5C2DF-F209-4763-AD1F-CFD37B5D3428.jpeg
    31C5C2DF-F209-4763-AD1F-CFD37B5D3428.jpeg
    158 KB · Views: 59
a good day in the shed this arvo, got the electrics where they are all going, now to make the final versions, the finished bulkhead and the old battery tray floor. I like the idea of the kill switch being out in the ope, the cdi and the M unit will be hidden away by the lid when its made. The connectors etc for the cdi, and the kill switch will be in a compartment under the old battery tray floor, this hides all the bulky connectors from view and keeps everything tidy. I think this looks really clean
The master cylinders for the clutch and front brakes have turned up, Brembo Radials, the front brake one looks wicked installed, but I will lower the reservoir onto a clamp fitting on the forks, as at the height it sits now, it won't pass under the fairing when you turn the handle bars. I have some gucci little cnc 38mm clamps coming for that, normally they are used for indicator installs on forks. i will fit the brake hoses this week as well, when they finally arrive, they are waiting in Alicante now, having cleared customs. Next stop Mallorca !
 

Attachments

  • IMG_6520.JPG
    IMG_6520.JPG
    174.4 KB · Views: 143
  • IMG_6478.jpeg
    IMG_6478.jpeg
    199.5 KB · Views: 137
Hot off the DHL flight from Australia!..... thanks to House of D'art... its bonza, being bolted on tonight with some of Japans finest grade 5 Ti bolts!
 

Attachments

  • IMG_6583.jpeg
    IMG_6583.jpeg
    32.8 KB · Views: 59
Todd... don't forget about starting that engine.... or one night while you are sleeping you will hear it suddently. It will be me after finishing my waiting patience:D:p
Soon brother , soon, I just had an update on my exhaust, so I am hoping that will be finished next week.....
I took a night off the shed last night, My Mother is about to leave to head back to NZ after being with us for the last 6 months, sounds like a long time, but time flies, and then in the last few days it just doesn't seem to exist, so there is lots of family dinners going on and good memories being talked about at the moment.
 

Attachments

  • 0d18fcc5-9a5f-44a8-b223-5219a7ed8878.jpg
    0d18fcc5-9a5f-44a8-b223-5219a7ed8878.jpg
    67.2 KB · Views: 94
  • 8f71aac8-2800-477e-be5b-2a28b924aef4.jpg
    8f71aac8-2800-477e-be5b-2a28b924aef4.jpg
    52.5 KB · Views: 91
  • 58ce1b6b-ff5f-439a-a38a-d8e36c8fe0fd.jpg
    58ce1b6b-ff5f-439a-a38a-d8e36c8fe0fd.jpg
    57 KB · Views: 83
  • 54ce4289-eaca-4683-80d3-fce6945d3bd0.jpg
    54ce4289-eaca-4683-80d3-fce6945d3bd0.jpg
    130.8 KB · Views: 95
Back
Top